
How to Draw Fashion Figures Step by Step for Beginners
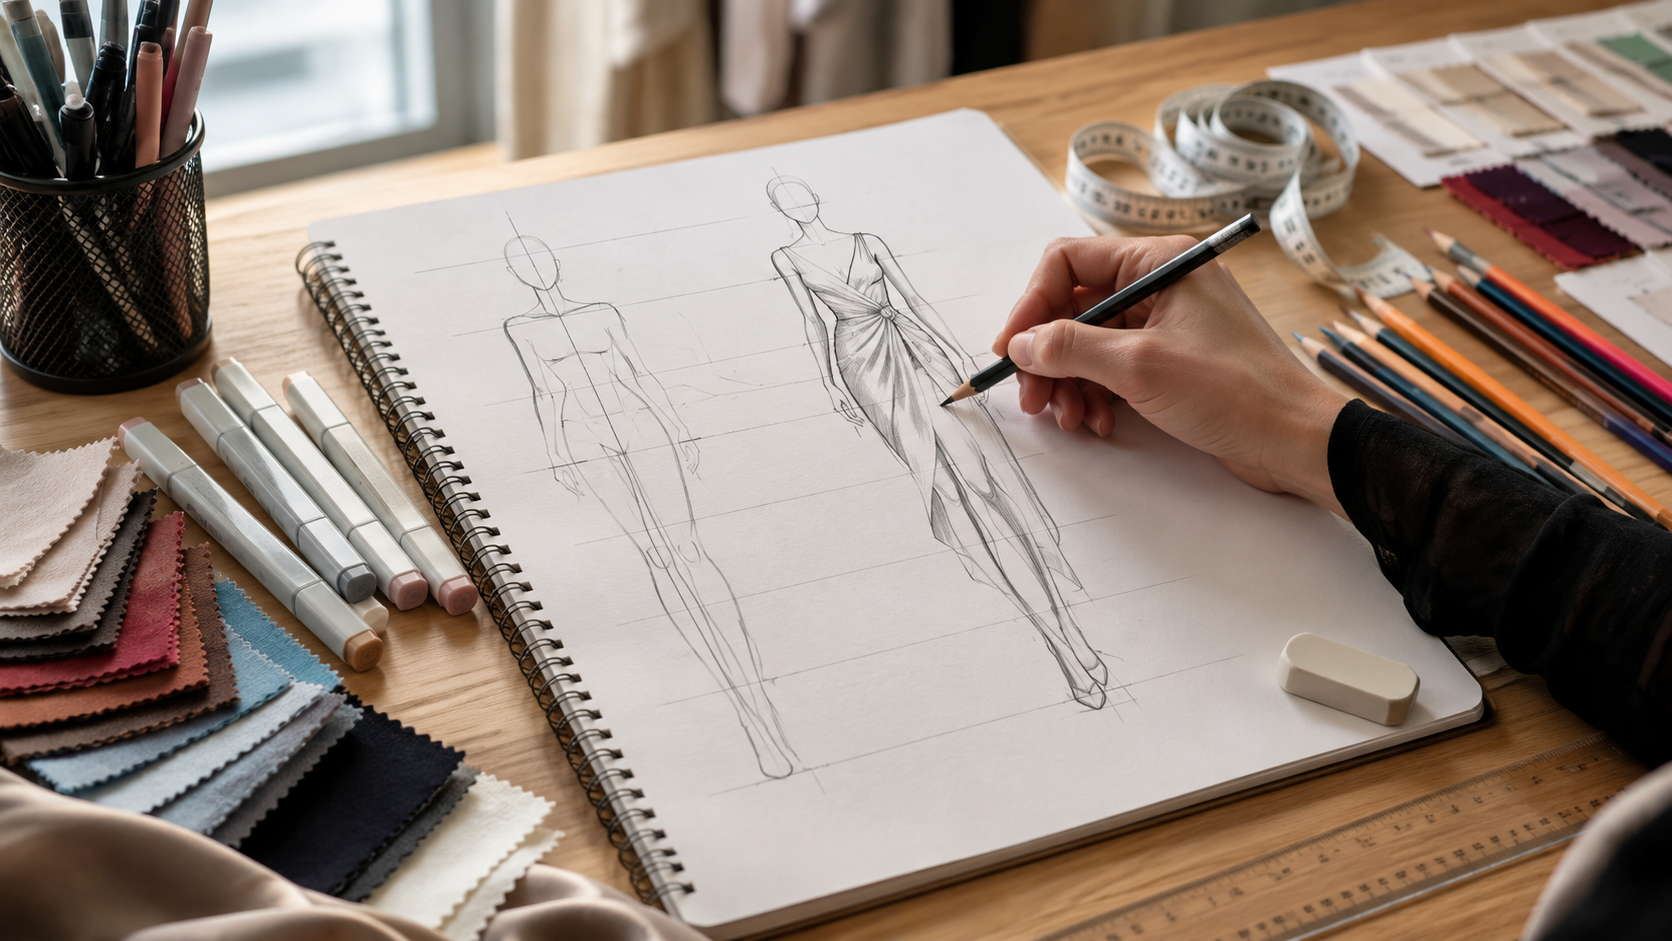
Every iconic fashion collection begins with a simple sketch. Before a garment is stitched, patterned, or showcased on a runway, it first takes shape on paper as a fashion figure, also known as a croquis. Whether you’re an aspiring fashion designer, a student preparing a portfolio, or someone who loves sketching clothing, learning how to draw fashion figures is one of the most valuable skills you can develop.
Many beginners believe they need exceptional artistic talent to create fashion illustrations. The truth is, fashion drawing is based more on understanding proportions and practice than on natural drawing ability. Professional designers don’t draw perfectly from memory—they rely on a structured method that ensures every figure has balanced proportions and elegant posture.
In this guide, you’ll learn everything you need to know about drawing fashion figures, from understanding the famous 9-head proportion system to creating dynamic poses and sketching clothing with confidence.
What Is a Fashion Figure?
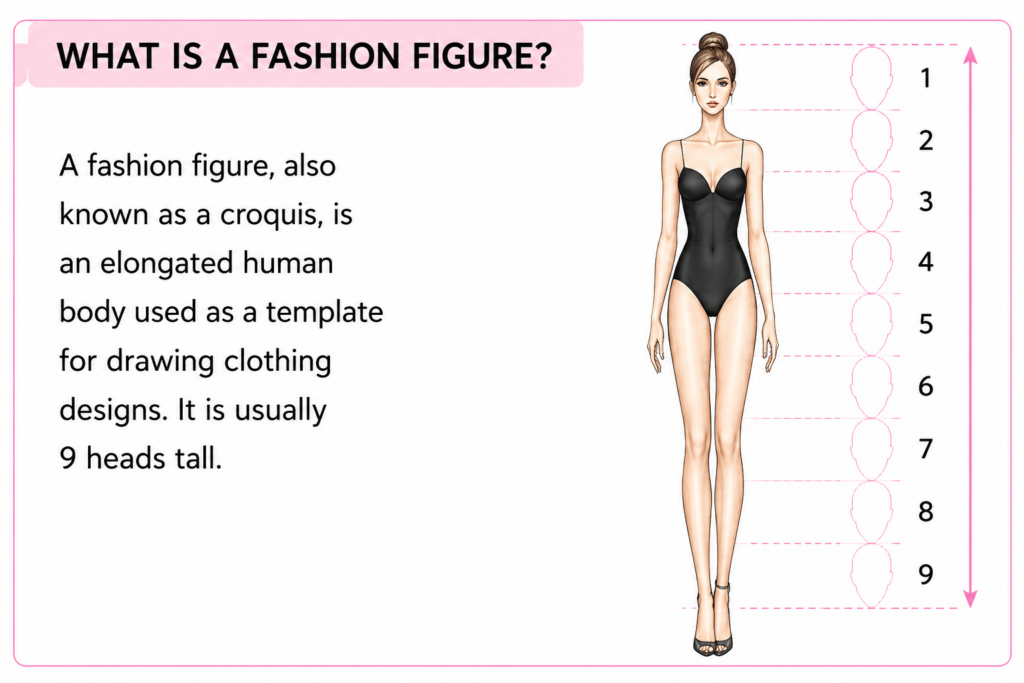
A fashion figure is a stylized drawing of the human body used to display clothing designs. Unlike realistic figure drawing, fashion figures are intentionally taller and slimmer to highlight garments, silhouettes, and fabric movement.
The basic body template is called a croquis, a French word meaning “quick sketch.” Designers often create one croquis and reuse it to experiment with different outfits, making the design process faster and more efficient.
It’s important to understand the difference between a croquis and a fashion illustration:
| Croquis | Fashion Illustration |
| Basic body template | Finished artwork |
| Focuses on body proportions | Includes clothing, color, texture, and details |
| Used for designing garments | Used for presentations and portfolios |
Think of a croquis as the foundation of a building. Once it’s complete, every fashion design you create is built upon it.
Why Are Fashion Figures Different from Real People?
If you’ve ever compared a fashion sketch to a real person, you’ve probably noticed that fashion figures have much longer legs and a slimmer body.
This is intentional.
An average adult body is around 7½ to 8 heads tall, while fashion figures are usually 9 heads tall. Some editorial illustrations even stretch the body to 10 heads for a more dramatic look.
These elongated proportions help:
- Showcase clothing more clearly
- Create elegant runway-inspired silhouettes
- Make garments appear longer and more stylish
- Provide extra space for design details
For beginners, the 9-head croquis offers the perfect balance between realism and fashion illustration.
Why Learn Fashion Figure Drawing?
Fashion figure drawing is much more than creating beautiful sketches. It helps you communicate ideas visually and brings your designs to life before they’re made.
Learning this skill allows you to:
- Visualize clothing ideas quickly
- Improve your understanding of garment proportions
- Create professional design portfolios
- Present concepts to clients or manufacturers
- Prepare for fashion design entrance exams
- Develop your own illustration style over time
Whether you plan to study fashion design or simply enjoy sketching, mastering fashion figures is an essential first step.
Tools You’ll Need
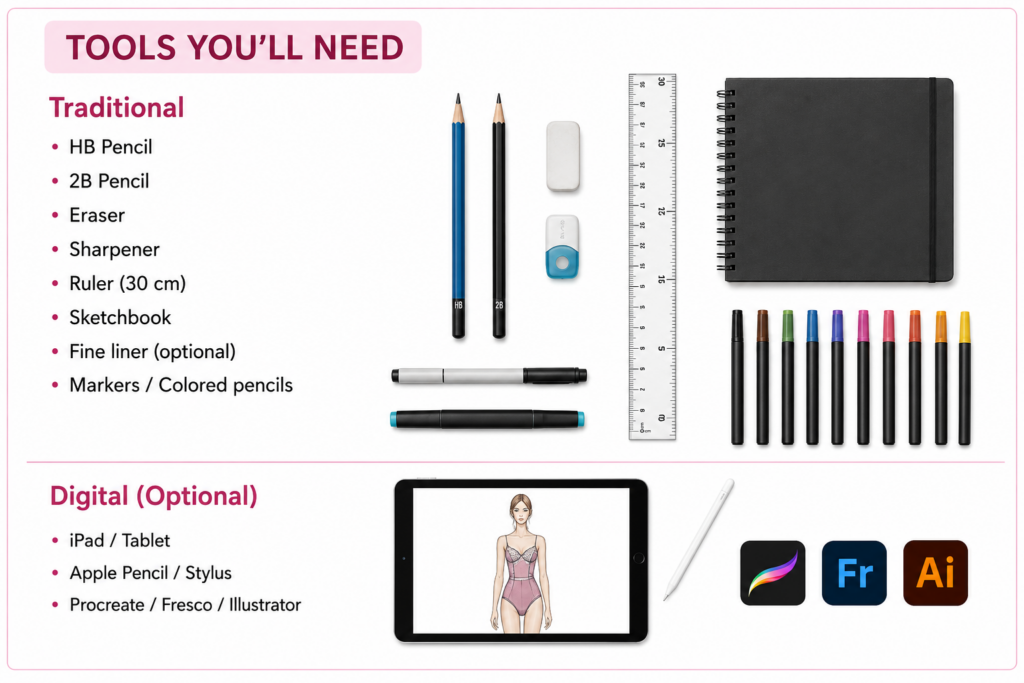
One of the best things about fashion illustration is that you don’t need expensive supplies to begin.
Traditional Drawing Tools
- HB Pencil for light guidelines
- 2B Pencil for darker outlines
- Eraser
- Sharpener
- 30 cm ruler
- Sketchbook or A4 drawing paper
- Fine liner (optional)
- Colored pencils, markers, or watercolors
Digital Drawing Tools
Many professional designers also work digitally using:
- iPad with Apple Pencil
- Drawing tablet (such as Wacom)
- Procreate
- Adobe Fresco
- Adobe Illustrator
- Photoshop
If you’re just starting, a pencil, ruler, and sketchbook are more than enough.
Understanding the 9-Head Fashion Figure
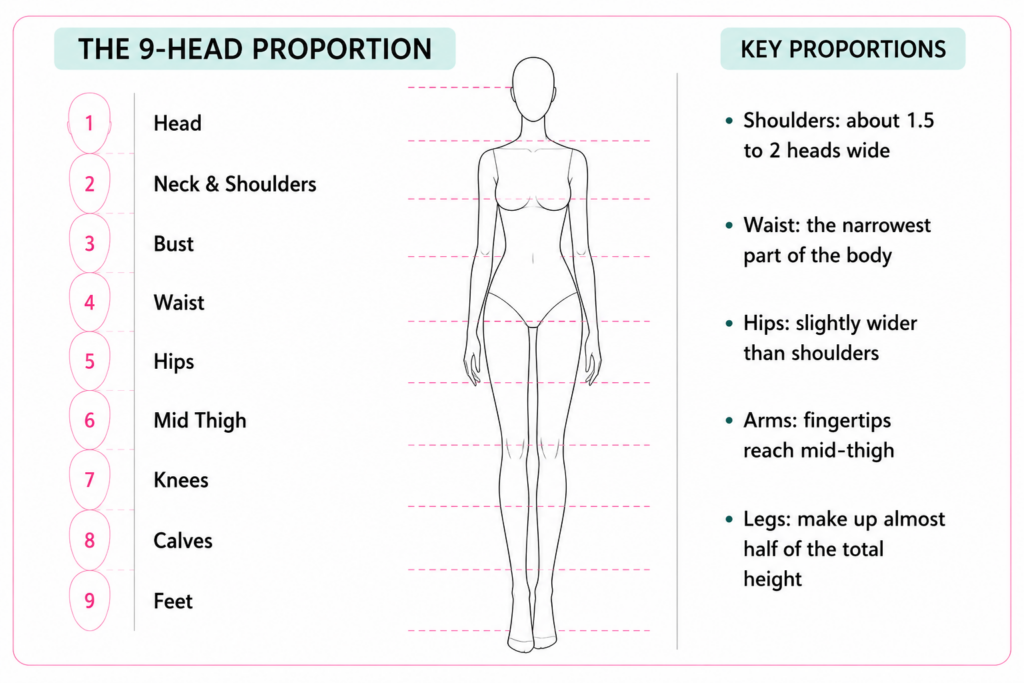
Fashion illustrators use the head as a measuring unit for the entire body.
Once you’ve drawn the head, divide the body into eight additional equal sections. These measurements help maintain accurate proportions.
| Head Unit | Body Landmark |
| 1 | Head |
| 2 | Neck & Shoulders |
| 3 | Bust |
| 4 | Waist |
| 5 | Hips |
| 6 | Mid-Thigh |
| 7 | Knees |
| 8 | Calves |
| 9 | Feet |
Although these measurements serve as guidelines, don’t worry about achieving perfection immediately. As you practice, estimating proportions will become second nature.
Step-by-Step Guide to Drawing a Fashion Figure
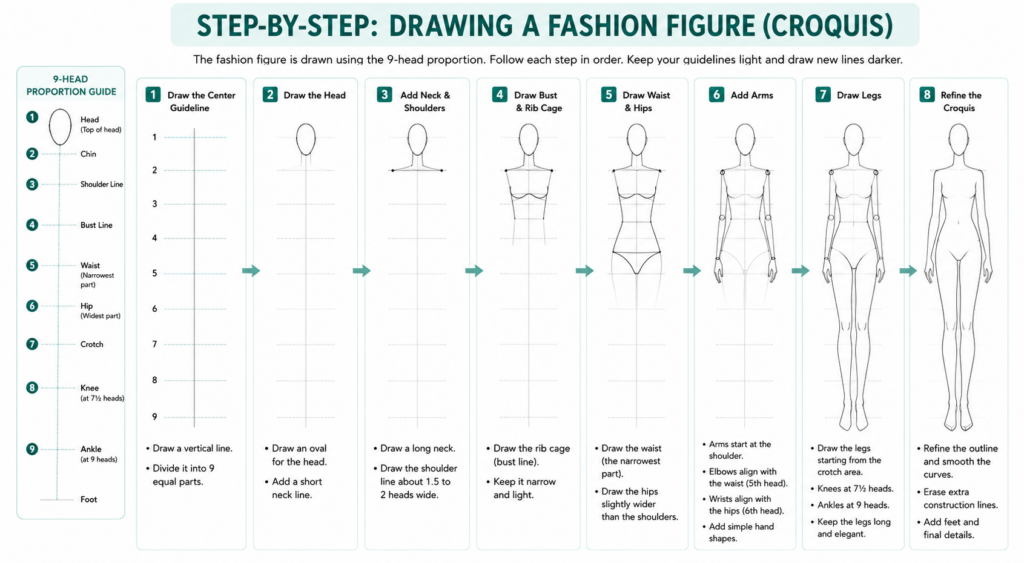
Step 1: Draw the Balance Line
Begin by drawing a straight vertical line down the center of your page. This is known as the balance line, and it represents your figure’s center of gravity.
Next, divide the line into nine equal sections using a ruler. These sections will guide the placement of every body part and help prevent uneven proportions.
Step 2: Sketch the Head
Draw an oval shape in the first section.
Fashion sketches don’t require detailed facial features. A simple head shape is enough because the primary focus should remain on the clothing.
Step 3: Draw the Neck and Shoulders
Extend a long, elegant neck beneath the head.
Draw the shoulders about 1½ to 2 head widths wide, keeping them relaxed rather than perfectly straight. This creates a more natural and graceful appearance.
Step 4: Build the Torso
Lightly mark the bust, waist, and hip lines using your proportion guide.
Fashion figures generally feature:
- A slim waist
- Smooth curves
- Slightly wider hips than the waist
- A shorter torso compared to realistic anatomy
Avoid making the spine too long. Most of the added height comes from the legs.
Step 5: Draw the Arms
Sketch the arms using gentle curves rather than straight lines.
As a guide:
- Elbows align close to the waist.
- Wrists sit around the hips.
- Fingertips usually reach mid-thigh.
At this stage, simple mitten-shaped hands are perfectly acceptable.
Step 6: Draw the Legs
The legs are the defining feature of fashion illustrations.
Mark the thighs, knees, calves, and ankles before connecting them with smooth, flowing lines.
Keep both legs balanced while allowing subtle curves to make them appear elegant instead of stiff.
Step 7: Add Hands and Feet
Simplify the hands into graceful shapes.
The feet should be slightly elongated and angled outward. Slightly larger feet help visually support the elongated body proportions.
Step 8: Refine Your Croquis
Once every body part is in place, smooth the outline and erase unnecessary construction lines.
You now have a completed croquis that can be reused for countless fashion designs.
How to Draw Clothes on a Fashion Figure
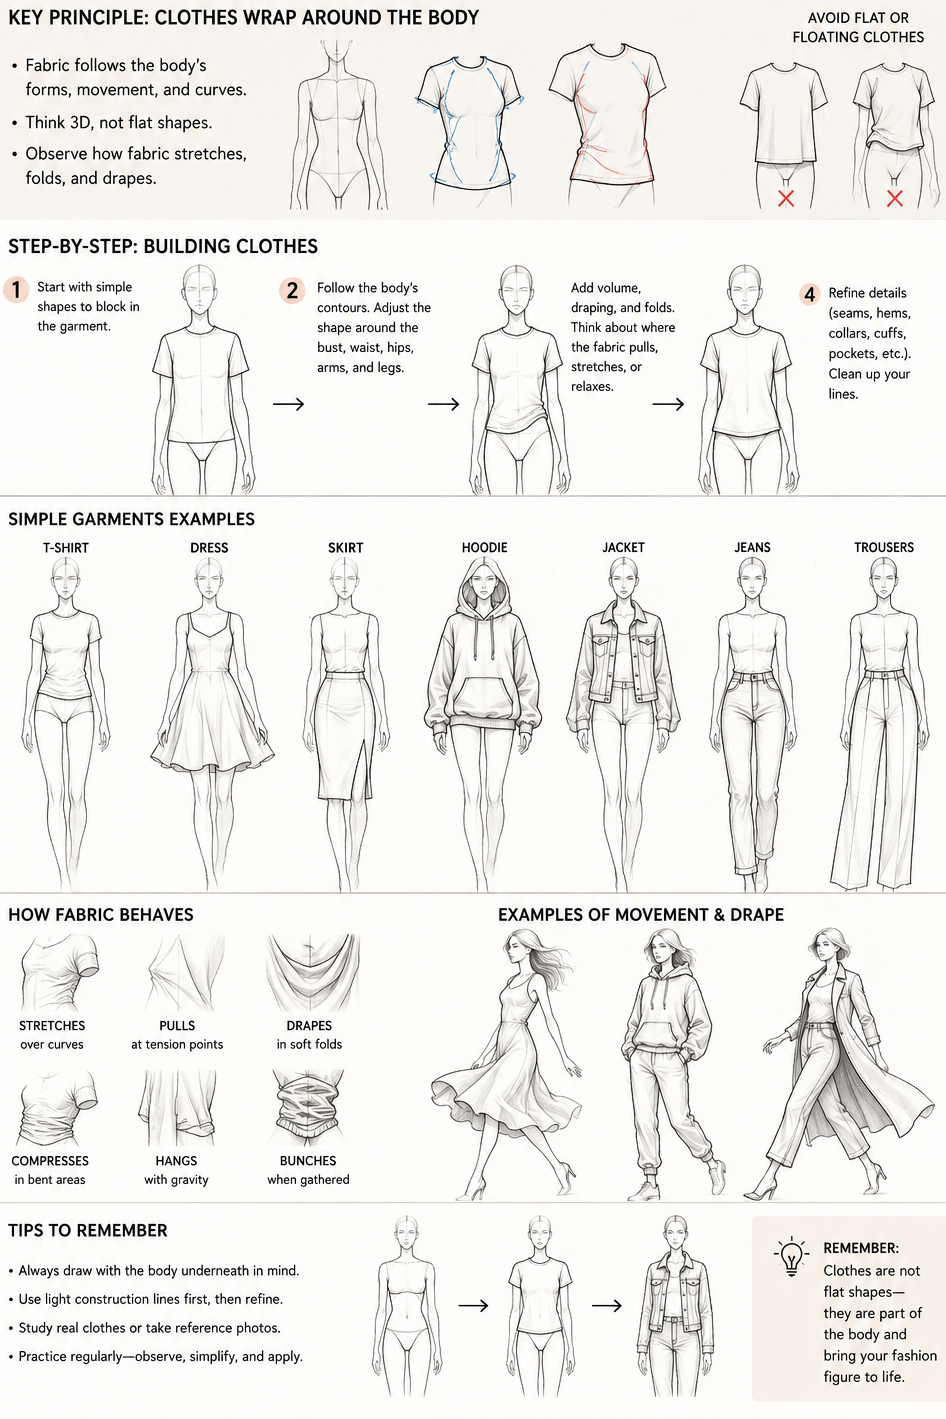
After completing your croquis, begin adding clothing.
Start with simple garments such as:
- T-shirts
- Dresses
- Skirts
- Hoodies
- Jackets
- Jeans
- Trousers
Remember that clothing wraps around the body. Fabric follows the body’s movement and curves, so avoid drawing garments as flat or floating shapes.
Understanding Fabric Movement
Every fabric behaves differently, and understanding this will make your illustrations look more realistic.
| Fabric | Characteristics |
| Cotton | Small, natural folds |
| Silk | Soft, flowing drapes |
| Denim | Heavy, angular folds |
| Wool | Rounded, thicker folds |
| Chiffon | Light, airy movement |
| Leather | Sharp folds with minimal drape |
A simple way to improve is by observing real clothing and sketching the folds you see.
Creating Dynamic Fashion Poses
Fashion illustrations should feel alive.
Instead of drawing every figure standing perfectly straight, try adding movement by:
- Tilting the shoulders
- Raising one hip slightly
- Bending one knee
- Curving the spine gently
- Shifting the body’s weight onto one leg
These subtle adjustments make your sketches look far more professional and allow garments to appear more natural.
Common Mistakes Beginners Make
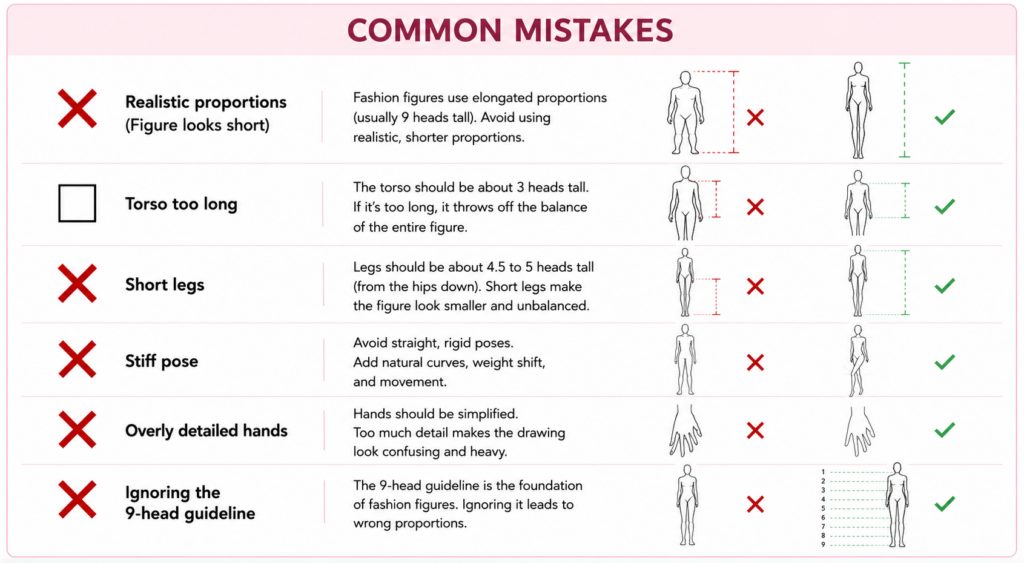
Learning from mistakes is part of the process.
Drawing Realistic Anatomy
Fashion figures are intentionally elongated. Avoid making the body look like a standard human figure.
Ignoring the 9-Head Grid
Skipping the guidelines often leads to uneven proportions.
Making the Torso Too Long
Keep the torso relatively compact and let the legs create the extra height.
Stiff Limbs
Straight arms and legs make illustrations look robotic. Use soft curves instead.
Adding Details Too Early
Perfect the overall shape before focusing on faces, fingers, or decorative clothing details.
Practice Plan for Beginners
Improvement comes from consistency.
Week 1
Practice drawing heads and 9-head grids.
Week 2
Complete at least 15 front-view croquis.
Week 3
Sketch simple garments on your croquis.
Week 4
Create complete fashion illustrations using different poses and fabrics.
Even 20–30 minutes of daily practice can dramatically improve your confidence within a month. For guided practice with the 9-head croquis, explore SEFT’s fashion design and illustration workshop.
Professional Tips for Better Fashion Sketches
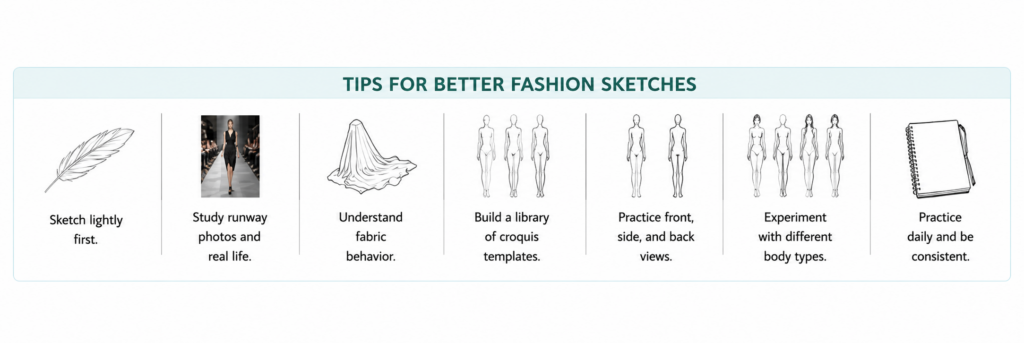
- Draw lightly during the construction stage.
- Study runway photography to understand posture and movement.
- Observe how different fabrics drape on real people.
- Build a personal library of croquis templates.
- Practice front, side, back, and three-quarter views.
- Experiment with different body shapes to improve versatility.
- Focus on clean silhouettes before adding details.
Traditional vs Digital Fashion Drawing
| Traditional | Digital |
| Pencil | Procreate |
| Paper | Adobe Fresco |
| Ink Pens | Illustrator |
| Markers | Photoshop |
| Watercolors | Digital Brushes |
Traditional sketching improves hand control, while digital illustration makes editing, coloring, and creating multiple variations much faster.
Frequently Asked Questions
What is a fashion croquis?
A croquis is a simplified fashion figure used as a reusable template for sketching clothing designs.
Why do fashion figures have long legs?
Longer legs create elegant proportions and provide more space to showcase garments.
Do I need to learn anatomy before fashion illustration?
A basic understanding of anatomy is helpful, but fashion illustration focuses primarily on stylized proportions rather than realistic body structure.
How long does it take to learn fashion figure drawing?
With regular practice for 20–30 minutes each day, many beginners see noticeable improvement within four to eight weeks.
Can I learn fashion illustration without attending fashion school?
Yes. Many designers begin by learning through books, online tutorials, and consistent practice before enrolling in a structured fashion illustration workshop.
Final Thoughts
Fashion figure drawing is the starting point of every successful fashion design. While your first sketches may not look perfect, every croquis you draw strengthens your understanding of proportion, movement, and garment construction.
Start with the 9-head method, practice consistently, and focus on building confidence rather than perfection. As your skills improve, you’ll naturally develop your own illustration style and create fashion sketches that are both expressive and portfolio-ready.
Remember, every professional fashion designer started with a single sketch. Your next drawing could be the first step toward bringing your own fashion ideas to life.